Thursday, August 20, 2009

AutoCAD Map Tips and Tricks

Data from the Web

One of the challenges for GIS users is finding data, and another is maintaining that data once you find it. Many times, another organization will have a data set that they are willing to share. Getting a copy of the data and incorporating it into your system is a relatively easy process. When that data is regularly being updated, keeping your copy of the data current is another matter altogether. The challenge is greater as the data is more dynamic.

Web Mapping Services (WMS – shares image data) and Web Feature Services (WFS – shares feature data) are a way to distribute, and receive data over the web. An organization can publish their data to the web into his format and make their data available to other organizations. Then any authorized user with the right tools can have a live connection to that web data. When data is updated, all of the connected users will have those updates as well.

AutoCAD Map 3D can use both of these services to allow the user to connect to these data sets and make them part of their drawings. The great part is that this data is a connection to live data rather than objects stored in the drawing, so they will not require space in the drawing (the other side of that is that the connection to the data must be live to see the data).

To add this data, you right click on the data icon in the Display Manager tab of the Map Task Pane and select “Connect to Data” (this also works in Civil 3D).


This will open the FDO Data Connect palette. Select Add WMS (or WFS) Connection.


The palette will show boxes to add the connection information.


Add a name for the connection, the web address, and the WMS standard version (which is usually part of the address) and select the Connect button.


Once you are connected, you have the option to select which data (image sets or layers) to add to the map. Select the “add to map” button and the data will appear in the drawing and the feature set will show up in the Display manager.


Now, you have a live connection to the data. You can save the drawing file, and the next time you open it, the connection will be reestablished.

This makes a relatively painless way to share GIS data. The user has immediate access to the data, any changes, and can’t modify the data in any way, but can use it as a part of their geographic data.

In addition, the Open Geospatial Consortium, Inc., a non-profit standards organization, maintains a list of some of these public web-enabled data sets. So next time you’re needing some data, check it out. Someone may have posted just what you need.

Tuesday, August 11, 2009

AutoCAD Map Tips

MAPIMPORT – Digging in to DGNs

AutoCAD Map 3D includes some additional tools for importing DGN (as well as other file formats) information into AutoCAD. There is a command called MAPIMPORT (you can reach it from the Map menu in the 2009 and earlier products, or from the Map Workspaces in 2010 – or just type MAPIMPORT). It allows you to import all or part of a DGN file. You will have the option to select the levels you want to import, as well as any attribute information. Furthermore, if you are commonly doing the same type of import, you can save the settings for future use. In your case, with a very large file, you may want to import the DGN in smaller parts by selecting groups of levels in the Input Layer section.

The process works like this – start the MAPIMPORT command. You will get this dialog box:


The top section allows you to manage any coordinate information. This is a way to project the source drawing objects into a new coordinate system.

The Spatial Filter allows you to import drawing objects by selecting an area.

The Saved Profiles section will allow you to modify how AutoCAD will recognize the source drawing objects, such as how to manage cells:


On the initial dialog box, the Input Layer provides a list of the levels present in the DGN file. You can select any or all of the levels you want to import. For large files you want to split up, this is a great way to do that. For Geospatial users building datasets, this is a method to break up the data by thematic groups.


The Drawing layer is the target AutoCAD layer. You can leave it as the Input Layer, select a layer from the drawing, create a new layer, or create a layer based on one of objects’ data fields from the DGN. Just select the ellipsis (…) at the right (click in the layer box to show it).


If you are using Map’s Object Classification tools, you can convert imported objects into classes.
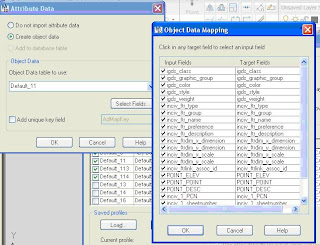
You can also convert the DGN’s data fields into AutoCAD Map Object Data as well, even going so far as to map the specific elements to specific Object Data fields.


At the right of the import properties, you also have some control of how certain insert objects are imported. You can use AutoCAD Points, text (with the value taken from a data field), blocks, and even get attribute values from the data fields.

You can also save this profile you’ve created, so that you can reuse it with other DGNs from the same organization (provided they use consistent standards).

You can learn all about the tool by starting the command, and clicking the help button on the dialog box. That will take you right to that section of the helps which will explain the tool.

Try it out – it’s a powerful way to work with outside data sources. Try it with files other than DGNs as well. It could save you some time.